Agent Alemca: General Installation Guide
This page aims to provide the necessary steps to create an entity on the Alemca platform, establish a connection with the device you want to monitor remotely, perform the initial installation of this device, install the Alemca agent (to enable communication between the device and the platform), and thus prepare your device for remote access and monitoring.
Prerequisites
Before starting the installation of the Alemca agent, make sure the following prerequisites are met:
- For Windows systems, you will need 8 MB of available disk space.
- For Unix systems, plan for 4 MB of available disk space.
Declaration and Pairing (Alemca Platform Part-1)
-
On Alemca App, we will access the inventory, and from among the inventories, we select the one where we want our entity to be included.

-
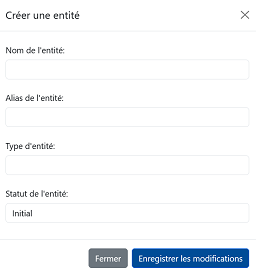
Then click on "Add an entity" to create a new entity.
-
In the "Entity Name" field, we enter the serial number of our device.
-
The alias will be the name we use.
-
For the type, we select Gateway (For the Teltonika TRB141, select Device), and for the status, we choose Active. Then, we save the changes.
-
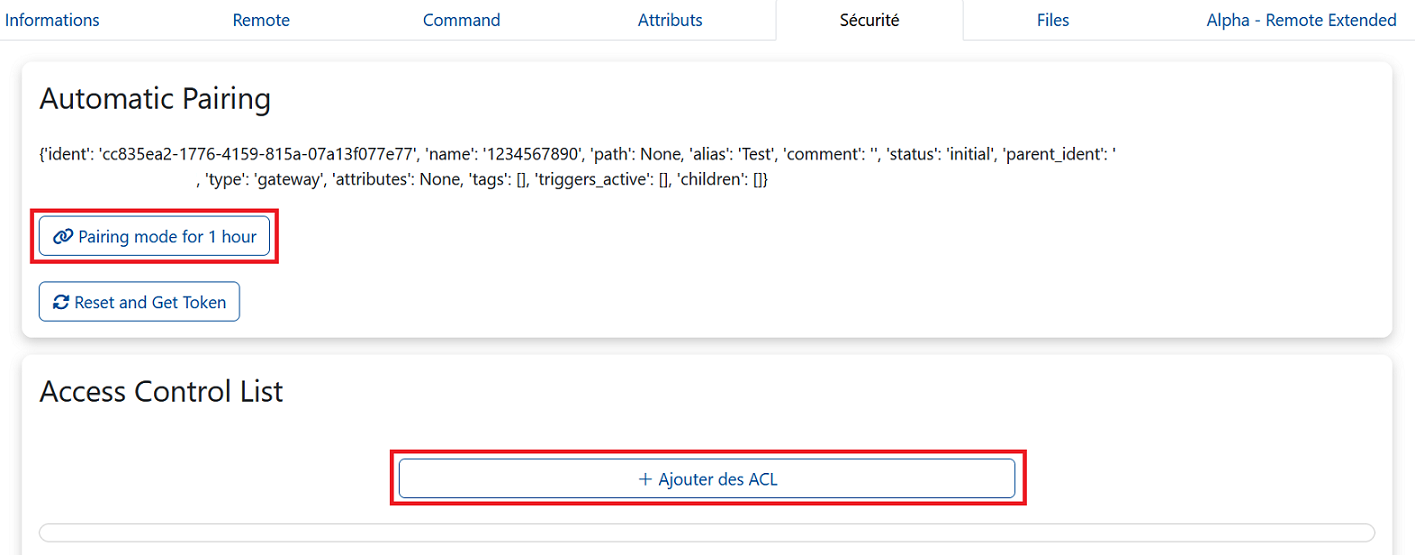
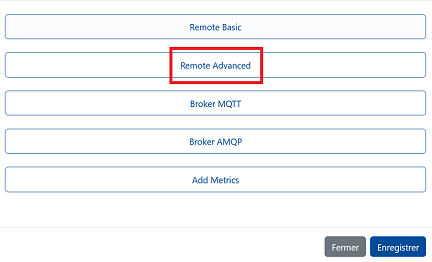
After clicking on the Security tab, in the Access Control List section, click on Add ACL, then select Remote Advanced and click on Pairing mode for 1 hour.
Hardware Installation
- We insert our SIM card inside.
If your device is a Teltonika RUT956, please also connect an external USB drive.
- We connect the power cable and the Ethernet/USB cable to our gateway/device.
- We connect the device to a PC.
Ensure that the network is properly established locally before proceeding. If the PC is connected to a Wi-Fi network, this Wi-Fi may block the local connection. Therefore, it would be better to disconnect from the Wi-Fi, connect our device, and then reconnect to Wi-Fi afterward.
Agent-Alemca Installation
- Retrieve the OS version of your machine:
- Download the installation file corresponding to your OS from the download page: Example:
- Install the package:
-
After enabling Pairing mode on the web interface, launch the agent with the
This command will create a new token for the device and automatically generate the configuration file, placing it in the--nameargument to automatically configure the agent:/etc/alemca/config.yamldirectory by default.Attention
-
Please remember that
your_device_namecorresponds tothe serial number of our device, do not confuse it with the alias. -
If we see an error like this: -ash: can't open 1********: no such file, ensure that the entity status is active, then retry the last line of code.
-
If you get an error like autoenroll error: error in getting ident and token, HTTP Get 400 Bad Request, check the pairing. If it is outdated, update it and repeat the last command (agent-alemca ...).
-
If you receive the error message ACCESS_REFUSED, make sure that pairing has been properly performed. If pairing was not done correctly, this could be the cause. Restart the device and try pairing again.
Success
The line "[config] config file updated successfully." indicates that the installation was successful. Seeing this line is enough; the other error lines you might see are not important.
-
-
Start the service:
- Check the service status:
- (Optional) Enable the service to start at boot:
- Retrieve the OS version of your machine:
- Install the package corresponding to your OS, see the download page
Example: -
After enabling Pairing mode on the web interface, launch the agent with the
This command will create a new token for the device and automatically generate the configuration file, placing it in the--nameargument to automatically configure the agent:/etc/alemca/config.yamldirectory by default.Attention
-
Please remember that
your_device_namecorresponds tothe serial number of our device, do not confuse it with the alias. -
If we see an error like this: -ash: can't open 1********: no such file, ensure that the entity status is active, then retry the last line of code.
-
If you get an error like autoenroll error: error in getting ident and token, HTTP Get 400 Bad Request, check the pairing. If it is outdated, update it and repeat the last command (agent-alemca ...).
-
If you receive the error message ACCESS_REFUSED, make sure that pairing has been properly performed. If pairing was not done correctly, this could be the cause. Restart the device and try pairing again.
Success
The line "[config] config file updated successfully." indicates that the installation was successful. Seeing this line is enough; the other error lines you might see are not important.
-
-
Start the service:
- Check the service status:
- (Optional) Enable the service to start at boot:
-
Enter the IP address (192.168.*.*) shown on the device in our browser and log in to the Teltonika site using the username and password provided on the box.
-
The system will prompt us to change our password, which we do.
Ensure that the
APNsettings for your SIM card are properly configured. You can learn how to configure your APN by following this link. -
Next, we establish an SSH connection via the command line.
-
The system will ask for a password. If we have already changed it, we will enter the new password; otherwise, we will use the password listed on the box.
-
Once the connection is established, we will see the RUT OS registration and can enter our commands.
-
We will use the following command to check the mobile connection status or connection settings of the device.
-
This will give us a number. This number should match the ICCID of our SIM card.
-
The command
will display information about the installed system version. At the same time, we need to visit the link (current version) below.On this link, among the links that appear, we will copy the one that corresponds to the
DISTRIB_ARCHvalue given after the commandcat /etc/openwrt_release. We recommend downloading the most recent version (latest) to benefit from the latest features and fixes.for RUT956
If your device is a RUT956, you need to go to System > Administration > Storage Memory Expansion and enable the connected USB drive. Because the installation we are going to perform will be on the USB drive.
-
You can check the available space on your disks with the following command:
- With the command below, we will connect to Alemca.
-
We write the following commands in order.
This command will create a new token for the device and automatically create the configuration file, placing it in the
/etc/alemca/config.yamldirectory (by default).Attention
- Please remember that
the name of our entitycorresponds tothe serial number of our device, do not confuse it with the alias. -
If we see an error like this: -ash: can't open 1********: no such file, ensure that the entity status is active, then retry the last line of code.
-
If you get an error like autoenroll error: error in getting ident and token, HTTP Get 400 Bad Request, check the pairing. If it is outdated, update it and repeat the last command (agent-alemca ...).
-
If you receive the error message ACCESS_REFUSED, make sure that pairing has been properly performed. If pairing was not done correctly, this could be the cause. Restart the device and try pairing again.
Success
The line "[config] config file updated successfully." indicates that the installation was successful. Seeing this line is enough; the other error lines you might see are not important.
- Please remember that
-
To restart the service, use this command:
- Check the service status:
- (Optional) To enable a service at system startup, use the following command:
- Open a command prompt.
- Download the installation file corresponding to your OS:
-
After enabling Pairing mode on the web interface, launch the agent with the
This command will create a new token for the device and automatically generate the configuration file, placing it in the--nameargument to automatically configure the agent:path_to_your_configdirectory.Attention
- Please remember that
your_device_namecorresponds tothe serial number of your device, do not confuse it with the alias. - Where it says
path_to_your_config, specify the directory where you want your configuration file to be saved. -
If we see an error like this: -ash: can't open 1********: no such file, ensure that the entity status is active, then retry the last line of code.
-
If you get an error like autoenroll error: error in getting ident and token, HTTP Get 400 Bad Request, check the pairing. If it is outdated, update it and repeat the last command (agent-alemca ...).
-
If you receive the error message ACCESS_REFUSED, make sure the pairing has been properly performed. If pairing was not done correctly, this might be the cause. Restart the device and try pairing again.
Success
The line "[config] config file updated successfully." indicates that the installation was successful. Seeing this line is enough; the other error lines you might see are not important.
- Please remember that
-
Create the service:
- Start the service:
- Check the service status:
- (Optional) Enable the service to start on boot:
Manual Installation – Reserved for Experts
This installation method is only recommended for experts. If the other options meet your needs, please prefer them. You should follow these steps only if no other option is suitable.
- Download the installation file corresponding to your OS from the download page: Example:
- Grant execution rights to the file:
- Move the file to the
/usr/bindirectory to make it globally accessible: -
After enabling Pairing mode on the web interface, launch the agent with the
--nameargument to automatically configure the agent:Attention
- Please remember that
your_device_namecorresponds tothe serial number of your device, do not confuse it with the alias. - Where it says
path_to_your_config, specify the directory where you want your configuration file to be saved. -
If we see an error like this: -ash: can't open 1********: no such file, ensure that the entity status is active, then retry the last line of code.
-
If you get an error like autoenroll error: error in getting ident and token, HTTP Get 400 Bad Request, check the pairing. If it is outdated, update it and repeat the last command (agent-alemca ...).
-
If you receive the error message ACCESS_REFUSED, make sure the pairing has been properly performed. If pairing was not done correctly, this might be the cause. Restart the device and try pairing again.
Success
The line "[config] config file updated successfully." indicates that the installation was successful. Seeing this line is enough; the other error lines you might see are not important.
- Please remember that
-
Start the service:
- Check the service status:
- (Optional) Enable the service on startup:
-
Create a configuration file for the Alemca agent:
Where it says
/path/to/my/, specify the directory where you want your configuration file to be saved. -
Launch the Docker container with the mounted configuration file:
-
Create a configuration file for the Alemca agent:
Where it says
/path/to/my/, specify the directory where you want your configuration file to be saved. -
Create a
docker-compose.ymlfile to launch the Docker container: - Launch the Docker container with Docker Compose:
Usage (Alemca Platform Part-2)
Note
The automatic pairing may be interrupted. In that case, don’t forget to click on the pairing mode for 1 hour button to retry pairing.
-
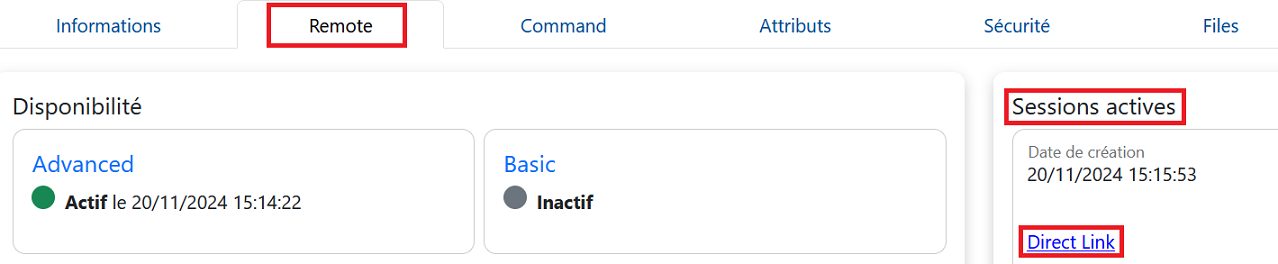
By clicking on the Remote tab, we can now check if availability is enabled.
-
By clicking on Create a session, we can open a session. In the Active Sessions section, by clicking on the Direct Link that appears, we will be redirected to the Teltonika site, where after entering the username and password, we can view the status of our device.
Conclusion
Congratulations, you have successfully completed all the necessary steps! You have created an entity on the Alemca platform, physically prepared the gateway, installed the Alemca agent, and paired the gateway and SIM card with the entity on the platform. You can now start collecting data from your devices and visualize it on the Alemca platform. For more information on agent configuration, refer to the configuration page.
Additional Information
Resetting Configuration
- To start over from scratch, the following command can be used:
Deleting an Entity
- When we wish to delete our entity, we click on Delete this entity in the Information tab. After confirming in the window that appears, we can delete it.
Resetting Access Information (IP / Password)
- If the IP / Password on the device's box doesn’t work, it may have been changed by the user. You can try resetting the device to use the IP / Password indicated on the box. Reset procedures may vary depending on the device type; check the internet for specific steps.
Possible Solutions for Potential Errors
- Make sure that the
config.yamlfile is not directly on the device but is located in the/etc/alemca/directory. If it is not, you can move it using the following command: